Hello blogger friends, here's another tutorial for you. This one uses both Gina's Designs chipboard and a few items found at the hardware store and in my kitchen. Of
all the embossable materials that I've tried, foil is my favorite.
The imprint is so clear and distinct it immediately draws the eye to
it's beautiful pattern.
In
this tutorial I'll show you how to double emboss with foil. This
simple technique will create a striking 3D effect on your projects
and add extra graphic impact. The raised image above the surface of
the foil will stand out and bring a higher measure of interest to
your piece of art.
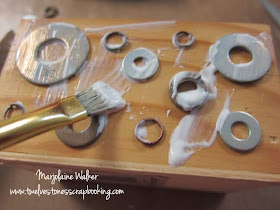
Step One: Adhere washers to the box with liquid adhesive. It's best to chose flat ones since any sharp or raised edge will rip the foil
Step
Two: Place a piece of foil inside an embossing folder and run it
through an embossing machine.
Step
Three: Use a paint brush to cover the wood and washers in decoupage medium.
Step
Four: Place the embossed foil over top and smooth it out with your
finger. You may need to use a Q-Tip to get around the washers.
Step
Five: Carefully rip the excess foil around the edges.
Step
Six: Paint the entire surface with gesso.
Step
Seven: Squeeze a few drops of ink and blending solution onto the felt
applicator of your blending tool. You can apply a few different
colors at the same time. Rub the ink on the surface until you have
complete coverage.
Step
Eight: Squirt a small amount of blending solution directly on some of
the darker areas and rub it off with a paper towel. This will cause
some of the foil to show and will give your piece a nice distressed
look.
Step
Nine: Color the edges of the box and the washers with a black
big brush marker. Smudge the ink with your finger.
Step
Ten: Sand some of the ink off with a sanding chip.
This
technique can also be used to make small embellishments and can make
fabulous backgrounds for ATCs or inchies. When coloring your piece
you can omit the gesso for a more metallic look that allows the
alcohol ink to shine on the foil.
I hope you enjoyed this tutorial and will give it a try soon. Please leave me a comment to tell me what you think.
Gears Shape Set from Gina's Designs
Gears Shape Set from Gina's Designs


very cool technique! tfs, hugs, Kim :)
ReplyDeleteThanks Kim!
DeleteThis is such a fun technique and I loved using it for a steampunk theme and I really love what you have created!!!
ReplyDeleteThanks Shanna, I think foil and steampunk go really well together!
DeleteKim, I LOVE this box. I'll probably end up trying out these techniques. Thanks so much for sharing. Your work is awesome!
ReplyDeleteThank you Marfa, I can't wait to see what you create with this technique!
DeleteSo creative! Thanks for sharing your techniques!
ReplyDeleteThanks Dawn!
DeleteWhat a great idea to double emboss the metal like that! Fabulous tutorial and project!
ReplyDeleteThank you Carmen, it was a lot of fun!
DeleteGreat idea and I LOVE the finished result!
ReplyDeleteThanks Sara!
DeleteFun, I love this idea, might have to try it myself.
ReplyDeleteI think you should! Thanks for dropping by,
Deletebeautiful
ReplyDelete